
about | articles | authors | contact | links
about | articles | authors | contact | links |
![]() Home > Articles > Infrared Photography > Reflected infrared photography: Processing the black and white image
Home > Articles > Infrared Photography > Reflected infrared photography: Processing the black and white image
INFRARED PHOTOGRAPHYAuthors: Prof. Robin Williams and Gigi Williams Reflected infrared photography:
|
| Developer | Kodak HIE | Maco 820c | Konica 750 |
| D76/ID-11 D76/ID-11 (1:1) Xtol (1+3) Rodinal (1+25) Rodinal (1+50) HC110 (Dil. B) |
11** 14 17 9 12 6 |
14 15 14 12 14 10 |
6 8.5 9 5 5 7 |
** The revised 1999 Kodak datasheet for HIE actually recommends only 8.5 minutes but the authors, along with many others, have found this results in very thin negatives.
It should be emphasized that these are only indicated times as a starting point for experimentation. Subject matter - the infrared reflection and transmission characteristics - and the nature of the illuminant both have a profound effect on the relative speed and contrast of infrared films so testing is a necessary process.
Kodak HIE can also be processed in reversal chemistry to create black-and-white transparencies that can then be scanned or projected. The Kodak T-max reversal processing chemistry works well. Very high film speeds, whilst maintaining granularity at acceptable levels can be achieved this way. The kit has good instructions for the interested reader. Jon Mided has web published a most extensive guide to development times for infrared films and the interested reader is recommended to consult his web site.
Uneven development resulting in patchy densities (Figure 44) seems to be a property of the Kodak HIE film (Marshall, 1978), and a meticulous agitation technique is required in order to avoid this. Three techniques have been used to overcome the problem: a water bath prior to the developer, actual brushing of the surface of the emulsion with developer (although this only applied to the 4x5 format) and nitrogen burst agitation systems. HIE is also notorious for exhibiting 'pinholes' variously attributed to manufacturing faults, temperature reticulation, lack of agitation, etc. The 4x5 version seemed much more affected than the 35mm version. One widely circulated explanation (apparently sourced from Steve Hedges at Eastman Kodak) is that minute particles in the anti-static layer of the film migrate into the silver halide layer under certain circumstances. Many photographers have wasted countless hours attempting to avoid these artefacts. Nowadays most simply scan affected negatives and use the dust and scratches filter in Adobe Photoshop to remove the problem blemishes.
 |
Figure 44 (left). A photograph of a grey card showing the 'classic' uneven development with the Kodak HIE film. |
The infrared negative should look fairly dense and "flat"(Figure 45). Printing infrared negatives is very difficult because there are no acceptable standards of what the subject should look like - no-one has ever seen it. As can be seen from Figure 46 there is quite a range of acceptable printing densities and contrasts. Basically, the idea is to print for the detail like the vessels and ignore the flesh tones. The print should be just dark enough to show the faintest details or structures, and contrasty enough to show them clearly.
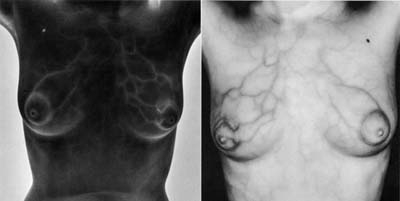
Figure 45 (above). The infrared negative (left) is typically dense and flat; the skin tones should look darker than those in an ordinary negative. In printing (right) the skin should appear as light as possible, but it is always best to print for the vein detail. If the recommended soft wrap-around lighting has been used it will be possible to print to a very high contrast index: thus enhancing detail.
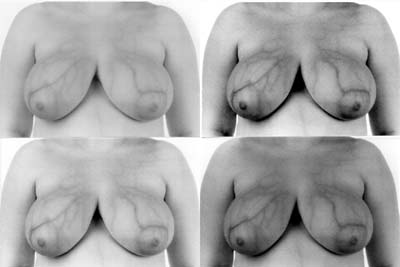
Figure 46 (above). There is quite a range of acceptable printing densities and contrasts for the infrared print. Upper left is a print on grade 1 paper, upper right on grade 5 paper. The lower left photograph is on grade 3 printed fairly light, the lower right on grade 3 printed much darker.
The quality of the finished prints can be enhanced immeasurably by using an unsharp mask in contact with the negative during printing. This serves two functions - auto-dodging shadow areas and enhancing fine detail by allowing a more contrasty grade of paper to be used. The unsharp positive area mask should be such that the lightest area yields a density of about 0.5. Contrast should be such that the ratio of darkest to lightest area is approximately 25% of the same ratio on the negative. The same effect can be achieved in the digital darkroom by using Adobe Photoshop.
| © 2002 Prof. Robin Williams and Gigi Williams - Disclaimer URL: http://www.medicalphotography.com.au/Article_03/ Last modified: 3 May 2002 |