Reflected infrared photography:
Lighting
Lighting technique is particularly important in reflected infrared work. Infrared photographs reveal density differences due to variations in the absorption characteristics of tissues, and any shadows cast by the lighting will cause confusion in interpretation.
We know from the laws relating to illumination that the light intensity on an inclined surface varies with the cosine of the angle of incident light, and that the illumination of any surface by a single light source varies across that surface by a factor equivalent to the Cosine³ of the angle of illumination. This accounts for the edges of curved surfaces, such as those of the torso or face, recording relatively dark when lit from the front. This problem is further exacerbated in infrared where the incident radiation is absorbed heavily into the skin. Therefore, illumination drops very quickly with increasing angle in infrared work. All of this leads to the requirement for the subject to be evenly illuminated, often using several sources of radiation.
Soft lighting produces a dramatically improved infrared record, not only because it eliminates the shadowing problems mentioned above, but also because the contrast of the resulting image can then be raised, thereby enhancing the detail of the blood vessels or other important subject matter (Figure 15). At the very least, therefore, two lights should be placed one on either side of the subject. But ideally some kind of "wrap-around" lighting should be used. Some workers go so far as to recommend the use of a white room or "tent" to obtain diffuse enough lighting (Gibson 1965, Gilder et al. 1970, Gilson et al. 1981). The diagram for Gibson's original infrared 'tent' can be seen in Figure 16. A modern version of the tent utilizes large diffusion panels such as those manufactured by Lightform for professional studio photography. The P22 panels are approximately 6'x3', and one placed either side of the patient at 45 degree angles and lit by two lights, provides very even illumination and good exposure levels (Figure 17). If a tent or is employed the diffusion material must be checked to ascertain whether or not it transmits infrared freely; otherwise there may be a significant loss of light.
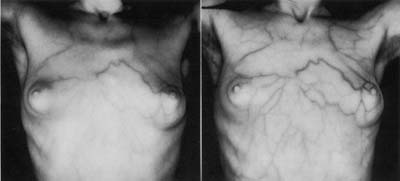
Figure 15. The infrared image on the left is lit conventionally with main and fill lights whereas that on the right has been recorded with wrap-around soft lighting using a tent. The softer lighting has then enabled the photographer to reproduce the image at a much higher contrast, revealing much more detail in the vessels. Images © Gibson.
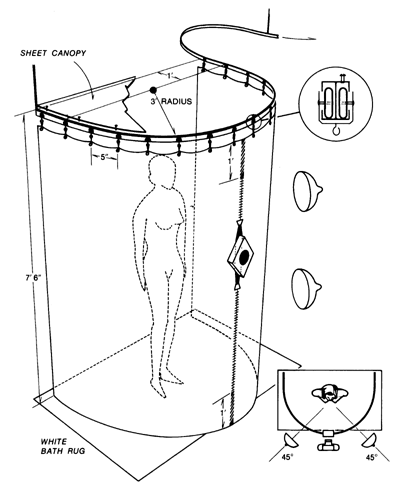
Figure 16. Gibson's original diagram for an infrared 'tent'.
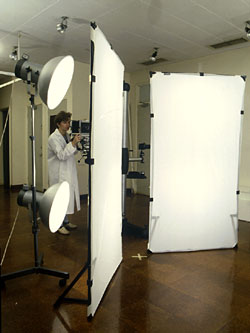 |
Figure 17. Lightform P22 panels in use to provide diffuse illumination for studio based infrared photography. |
As with ultraviolet techniques, one must remember that different background materials, papers, and paints reflect infrared radiation more or less successfully, and may produce very unpredictable tones. Many photographers prefer to work with an unlit black background for infrared work. Once again, the recommendation is to test any background photographically.
References:
- Gibson, H., Buckley, W. & Whitmore, K., 1965. "New vistas in infrared photography for biological surveys," J. Biol. Photogr. Ass 33(1):1-33.
- Gilder, R. & Rutherford, A., 1970. "Diffuse lighting for infrared photography in medicine,: Med. Biol. Illustr. 20:227-230.
- Gilson, C. & Parbhoo, S., 1981. "Standardized serial photography in the assessment of advanced breast cancer," J.Audiovis. Media Med. 4:5-10.
|
