
about | articles | authors | contact | links
about | articles | authors | contact | links |
![]() Home > Articles > Fluorescence Photography > Ultraviolet induced fluorescence: Filters
Home > Articles > Fluorescence Photography > Ultraviolet induced fluorescence: Filters
FLUORESCENCE PHOTOGRAPHYAuthors: Prof. Robin Williams and Gigi Williams Ultraviolet induced fluorescence:
|
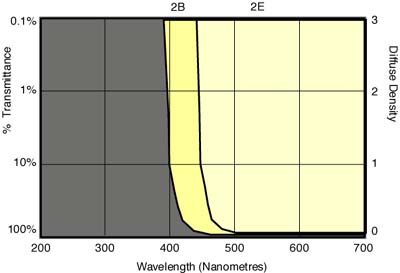 |
Figure 6 (above). The Wratten 2 series filters are technically suited as barrier filters for the ultraviolet induced fluorescence technique with cut-offs at between 400nm and 450nm. |
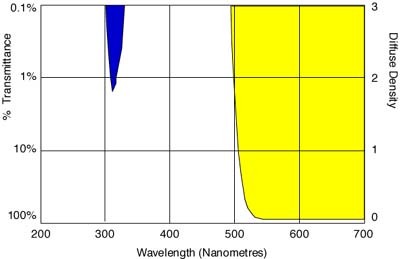 |
Figure 7 (above). The transmission curve for the Wratten 12 yellow filter, classically used in ultraviolet induced fluorescence imaging. |
Ultraviolet absorbing filters, especially gelatin ones, fade with exposure to ultraviolet, so should be replaced regularly (Figure 8). Also, some gelatin filters may themselves fluoresce when excited by ultraviolet radiation. All of the Wratten ultraviolet absorbers - 1A, 2A, 2B, 2E, 12 and 15 - fluoresce slightly when illuminated by short-wave ultraviolet radiation. Figure 9 shows the Wratten 2E filter fluorescing when stimulated by short wave ultraviolet. The remedy for this is to fit the filter to the rear of the lens so that the glass of the lens absorbs the short wavelengths causing the fluorescence before they reach the filter.
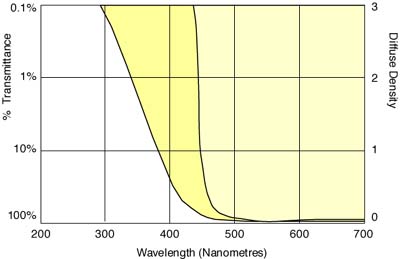 |
Figure 8 (above). Transmission curves for a new (right) and well used (left) Wratten 2E filter demonstrate that these ultraviolet absorbing filters gradually loose their effectiveness and should be replaced regularly. |
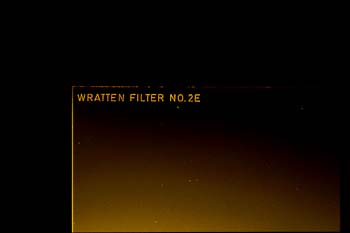 |
Figure 9(above). This fluorescence photograph of a Wratten 2E filter was taken with short wavelength radiation and a Wratten 15 barrier filter, and demonstrates that the Wratten 2E actually itself fluoresces. For critical work the barrier filter is therefore more effective if it is placed behind the lens: which then absorbs the shorter wavelengths of ultraviolet. |
The "efficiency" of any excitation/ barrier filter combination can be tested by photographing a metallic object such a ball bearing - as metals do not exhibit autofluorescence (Hansell, 1968). Ideally, the specular reflection from the source off the metal should be entirely absorbed by the barrier filter on the camera lens. If however, the combination of excitation and barrier filter is perfect, there may be difficulty in orienting some subjects. This is because only the fluorescence records on the film since there is no background illumination. Some workers (eg. LeCover, 1972) have advocated providing a low level of overall illumination to orient the subject, but this must be carefully balanced so as to avoid swamping the fluorescent areas. A better technique is to mismatch the excitation and barrier filters to allow some "background" illumination. It can also be helpful to include some known fluorescent test object within the field of view, eg. text written with a fluorescent "highlighter" pen, in order to 'prove" that the filter combination is working. Figure 10 shows the use of both test objects - fluorescent test marker and steel ball - in a single exposure.
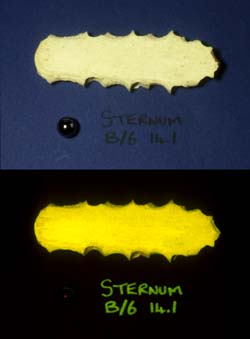 |
Figure 10 (left). A specimen of bone is photographed normally (above) and with the ultraviolet induced fluorescence method (below). Included within the scene are a polished metal ball-bearing to determine the effectiveness of the filter combination and fluorescent writing to 'prove' the stimulation. |
| © 2002 Prof. Robin Williams and Gigi Williams - Disclaimer URL: http://www.medicalphotography.com.au/Article_02/ Last modified: 3 May 2002 |